

How to tune the TV to receive digital and satellite channels
 After buying a TV set, the first thing to do is to properly configure it.
After all, in fact, this device only outputs an image from any compatible signal source. And this can be a TV antenna, a satellite receiver or even a "smart" set-top box.
Most of the difficulties users have is with the tuning of TV channels. And it can be done in two ways: manually and automatically searching for new channels.
How is this done on TVs from different manufacturers? And what about Smart TV: what should the user know in advance before setting up such a TV?
Contents
How to set up TV after buying
Setting up TV channels on your TV can be done in two ways:
- manually;
- With automatic search.
Previously, you only need to connect the antenna to the appropriate input. In modern TV can also be integrated satellite or T2-receiver.
That is, you do not need to connect the antenna through a special set-top box, just find the appropriate input (we recommend that you first read the instructions that come with the TV).
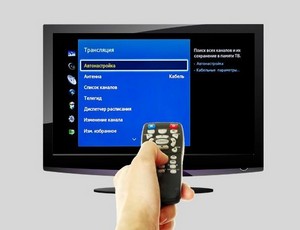
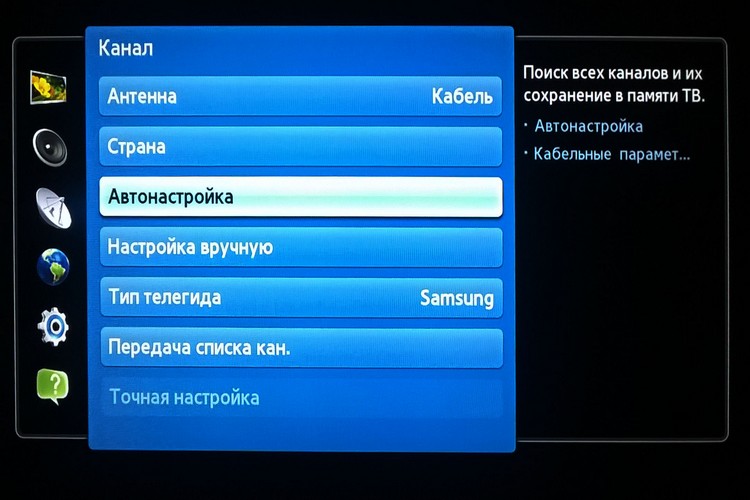
Automatic search
It is recommended to use the automatic search by default.
All you need to do in this case is to connect the antenna, then use the built-in TV menu to select "Auto search TV channels" and wait for the end of the scanning of the air. The whole procedure, on average, takes from 10 to 20 minutes (depending on the signal source).
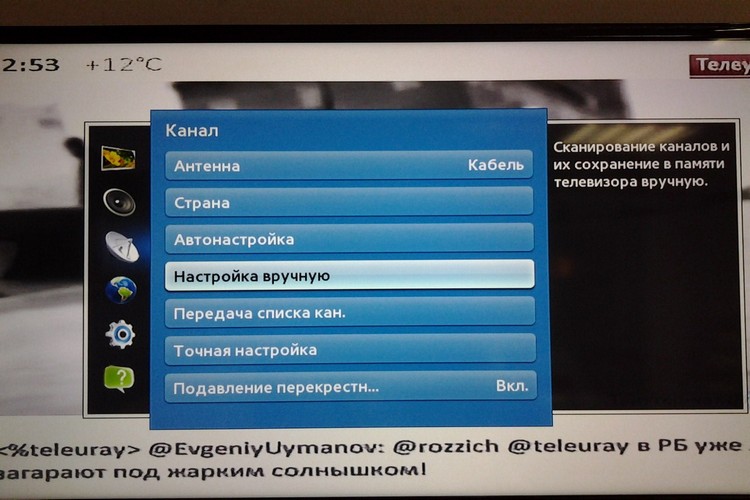
Manual search
The optimal option for those cases where the user wants to add to the playlist (list of TV channels) not all detected programs, but only a selection.
In this case, the channel search starts, and when a signal is detected, it is offered to save it or continue scanning. That is, the user will need to manually confirm the saving of each detected TV channel.
The main advantage of this option is that it completely eliminates the addition of non-functional channels to the playlist (which were accidentally detected by the scanner, but in fact on a given frequency - noise).
Also with a manual search you can clear the list of possible duplicates (as a rule, regional TV channels are broadcast simultaneously on several unoccupied frequencies).
Smart TV setup
Smart TV is a TV set, but with a pre-installed operating system. The most common ones today are Android TV, Tizen OS and Web OS.
There, too, there is both manual and automatic search. And one of the main differences is the support for so-called "combined" playlists. That is, when the list of TV channels adds programs from both satellite and conventional antenna.
And in some TVs, you can also add IPTV (although to view Internet TV it is recommended to use third-party programs that are recommended by the IPTV provider itself).
The algorithm of the TV tuning itself will be approximately as follows:
- Go to the settings menu.
- Select "Channels". On some TVs, this item is referred to as "TV Guide".
- Select "Channel settings" and select "Auto search".
- Confirm the broadcast scan. Also, if necessary, set a new name for the created playlist. Otherwise, the current list of saved TV channels will be deleted.
It should also be noted that in many Smart TVs (from Samsung, Lg, Xiaomi, Supra, Sony, Philips, Hyundai, Dexp, Haier, Telefunken, Jvc, Panasonic, Starwind, Thomson, Mystery, Sharp, TCL, BBK, Horizont, Vityaz) you can fully use the TV only after authorization.
But first you need to connect it to the Internet, to create a personal profile (using the built-in menu).
In the same Android TV this will enable cloud storage settings. That is, in the future, after installing a new TV, you will only need to specify your username and password. And all the other parameters will be loaded automatically.
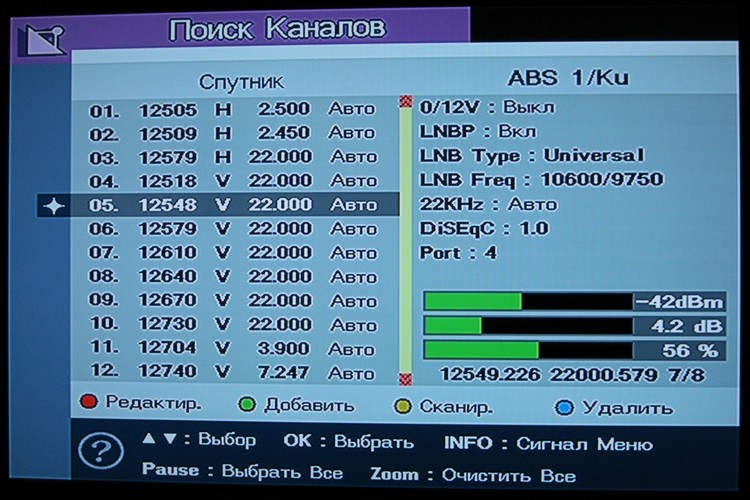
Setting up satellite TV channels
If the TV is an outdated model, ie without a built-in satellite receiver, you need to configure the TV set top box to which the antenna is connected. And on the TV you only need to select the source of the connected signal (in most cases it is AV, selected by the button with the same designation on the remote control).
If the receiver is integrated into the TV, then the configuration algorithm is as follows:
- Connect the antenna to the appropriate input.
- Go to "Menu", select "TV channels", select "Tune" (or can be named as "Search").
- Select the type of connected antenna (satellite).
- If necessary, specify the scanning range (frequencies, if necessary, specify the provider, if the connection was made through him).
- Press "Search" and wait for its completion. It may take from 2 to 20 minutes.
Next, you just need to form convenient playlists. Most often it is divided by satellites (3 or 6, depending on the type of installed satellite dish).
You should take into account that if you scan the whole air of satellite TV channels, you will add about 1000 TV channels to the playlist.
There is another option for customization, which is to use already generated custom playlists. As a rule, they can be found and downloaded on thematic forums. Next, you need to transfer the file to an external drive, connect it via USB to the TV. And then in the settings of TV channels select the appropriate item (add TV channels from the file), specify the item to the playlist and wait for its integration.
Why is the latter option more preferable? Because there the channels will be grouped, for example, by subject or country. After all, most users in the future are actively watching only 30 to 40 TV channels.
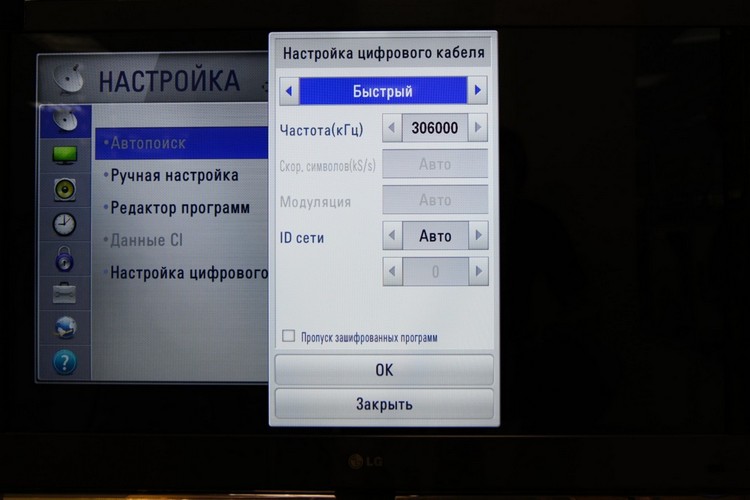
Setting up digital TV channels
Digital television comes in two types:
- Through an analog antenna. The received signal is converted into a compatible digital signal with a DVB-2 receiver.
- Internet TV. Works even without a connected antenna. Instead, the TV must be connected to the Internet (via cable or wireless WiFi).
If you are tuning T2 TV (i.e. an external antenna is connected to the TV), the tuning principle will be the same as for satellite channels. Only to load your own playlists - will not work. It is recommended to use automatic scanning of the air.
If we are talking specifically about IPTV or OTT (streaming media protocol, adapted specifically for TVs), then this is set up in 2 ways:
- Through an external IPTV or OTT set-top box provided by the provider to whom the subscriber is connected.
- Through a proprietary application for SmartTV. You need to install it from the built-in application store, and then - authorize in the application and, if necessary, top up the subscriber's account. The list of TV channels is downloaded automatically from the provider's server. You just need to take into account that to watch IPTV you need a stable Internet speed of about 10 - 20 Mbit/s or higher. If the speed is lower, the image on the screen will be either low resolution or with various artifacts.
How to configure the TV without a remote control
If for some reason you can't use the remote control (for example, the batteries are dead and there are no new ones), you can do the initial setup on most TVs using the control panel (if it's provided).
As a rule, there are Menu buttons, as well as volume keys and TV channel switching keys that are used to navigate through the settings. The Vol+ and Vol- buttons (responsible for adjusting the volume) work as "up" and "down", respectively. And Ch- and Ch+ - as "left" and "right".
Possible problems and solutions
The most common difficulties users encounter when setting up a new TV:
- When scanning the airwaves, no TV channel can be found. This, in most cases, means that the wrong signal source is specified. Or the antenna does not work, the crimping was not done correctly. You need to check that the scan settings are correct. And then - check the cable for short circuits (for this you will need a multimeter that supports the "check" function).
- When searching for TV channels a lot of duplicates are added to the playlist. In such situations it is recommended to use a manual search. Many TVs also have a playlist editing function. That is, some TV channels can be excluded from the general list, all others will be automatically grouped.
- When searching for TV channels with an external antenna connected, none can be found. In most cases, it indicates that the signal amplifier is not connected (if it is external). Or it is already simply out of order (happens often, since the antenna is always outdoors).
To summarize, the most difficult thing is to figure out how to enter the TV settings, as well as run an automatic or manual search for TV channels.
It is recommended to refer to the manual, there is a detailed description of how to do this both with the remote control and only using the panel on the TV itself.
Most of the difficulties users have in this regard is with Smart TV, because there are a lot of additional functions.
Useful video
See in the video how to set up a TV for cable TV: